If you value your privacy online, Apple’s Hide My Email feature is a game-changer. Whether you’re signing up for newsletters, registering for apps, or filling out online forms, this tool helps protect your real email address from spam, tracking, and unwanted marketing.
But what about Hide My Email settings? Where do you find them, how do you customize the feature, and can you manage or delete previously created addresses?
In this guide, you’ll learn everything you need to know about accessing and managing Hide My Email settings on iPhone, iPad, Mac, and iCloud web.
What Is Hiding My Email?
Hide My Email is a privacy feature by Apple that creates unique, random email addresses you can use in place of your real one. These addresses forward incoming mail to your real inbox without revealing your personal email to the sender.
It’s part of Sign in with Apple and also available to iCloud+ subscribers, allowing you to:
- Mask your email address
- Stop spam and marketing
- Manage each alias separately
- Disable or delete addresses anytime
Useful for account sign-ups, online forms, and test registrations.
Where to Find Hide My Email Settings on iPhone or iPad

If you’re using iOS 15 or later, here’s how to access and adjust Hide My Email settings.
Steps:
- Open Settings
- Tap your Apple ID name at the top
- Select iCloud
- Tap Hide My Email
Here, you’ll see a list of all the aliases you’ve created, along with their forwarding status and the apps or websites they’re connected to.
From here, you can:
- View full addresses
- Change which real email they forward to
- Disable or delete aliases
- Label addresses for better tracking
This is your central control panel for Hide My Email on iPhone and iPad.
Access Hide My Email Settings on Mac
Steps for macOS Monterey and later:
- Open System Settings
- Click on your Apple ID
- Go to iCloud
- Click Hide My Email
The layout is similar to iOS. You can view, manage, and delete aliases from here as well.
Great for desktop users managing multiple aliases across apps and websites.
Access Hide My Email Settings on iCloud.com
You don’t need a device nearby—Apple allows web access too.
Steps:
- Visit iCloud.com and log in
- Click Account Settings
- Scroll to Hide My Email section
- View or manage email aliases
This method is ideal for accessing your settings from a Windows PC or borrowed device.
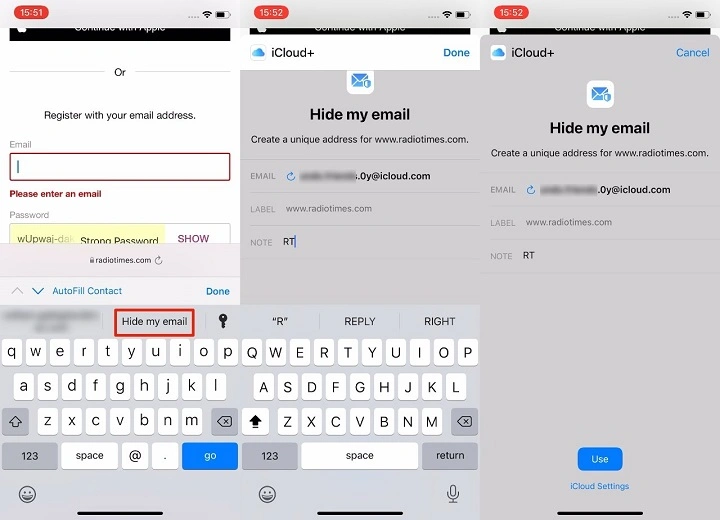
How to Create a New Hide My Email Alias
You can create new aliases whenever needed (iCloud+ required for custom ones).
On iPhone or iPad:
- Go to Settings > Apple ID > iCloud > Hide My Email
- Tap Create New Address
- Apple generates a random address (you can refresh for a different one)
- Label it and optionally add a note
- Tap Next > Done
On Mac:
- Go to System Settings > iCloud > Hide My Email
- Click Create new address
This alias can be used immediately for any form or app.
How to Delete or Disable a Hide My Email Address
If you no longer want emails forwarded from a certain alias:
Steps:
- Go to Hide My Email settings via device or iCloud
- Tap or click the alias you want to edit
- Select Deactivate email address
You can reactivate it later if needed.
To permanently delete it:
- Tap Delete Address
- Confirm your decision
Useful when an alias starts receiving spam or is no longer in use.
Change Where Hide My Email Forwards Messages
You can choose which of your real emails receive forwarded messages.
Steps:
- Go to Hide My Email settings
- Select the alias
- Tap Forward To
- Choose an alternate verified email address (must be registered with your Apple ID)
Note: You can’t use non-Apple addresses unless added to your account.
Use Hide My Email with Sign in with Apple
When using apps that support Sign in with Apple, Hide My Email is automatically enabled.
- You get a random email alias
- The app only sees the alias—not your real address
- You can disable forwarding if you stop using the app
To manage these:
- Go to Settings > Apple ID > Password & Security > Apps Using Apple ID
- Tap any app
- See the email used and turn off forwarding if needed
This adds a privacy layer to third-party app accounts.
Customize or Label Hide My Email Addresses

When creating a new alias, always add a label (e.g., “Shopping”, “Work Tools”, or “Fitness App”). This helps:
- Identify where an alias is used
- Recognize spam patterns
- Track account access and security
You can edit labels anytime in the settings panel.
How Many Hide My Email Aliases Can You Create?
iCloud+ users can create hundreds of aliases, but Apple may limit abuse. For most users, managing 10–50 aliases is more than enough.
Free Apple ID users:
- Can only use Hide My Email with Sign in with Apple
- No custom alias creation unless they upgrade to iCloud+
Hide My Email vs. Custom Email Domain
| Feature | Hide My Email | Custom Email Domain |
| Purpose | Mask real address with a random alias | Use a custom domain with iCloud Mail |
| Visibility | Aliases visible to you only | Custom address is public-facing |
| iCloud+ Required | Yes (for full access) | Yes |
| Use Cases | Forms, apps, temporary signups | Professional or branded emails |
You can use both features together for maximum control.
FAQ
What is Hide My Email in settings?
Hide My Email is an iCloud+ feature that lets you create random email aliases to protect your real email address. It’s found in Settings > Apple ID > iCloud > Hide My Email.
How do I change Hide My Email settings?
Open Settings > Apple ID > iCloud > Hide My Email to manage aliases, create new ones, disable forwarding, or delete unused emails.
Can I delete a Hide My Email alias?
Yes. Go to the alias in your settings, then choose Deactivate or Delete. This stops all forwarding from that address.
How do I create a new Hide My Email address?
Tap Create New Address inside the Hide My Email section of your settings. Label it and save for use in forms or logins.
Do I need iCloud+ for Hiding My Email?
Yes—for full access to custom aliases and manual creation. Basic use is available with Sign in with Apple for free users.