
Have you ever experienced that heart-dropping moment when you hit the “send” button and immediately realize you made a mistake in your email? We’ve all been there! Thankfully, Outlook, the popular email client, provides a solution that can save you from such embarrassing situations. With Outlook’s handy feature, you can delay sending an email and give yourself a chance to review, correct, or rethink your message before it reaches the recipient’s inbox.
In this article, we’ll guide you through the process of How to Delay Sending an Email in Outlook, step by step. So, let’s dive in and explore how you can master the art of timing your emails perfectly!
Understanding the Need to Delay Email Sending
You’re about to send an important email to a client, and suddenly you spot a typo in your message. Alternatively, you may have composed a passionately worded response and come to the realization that it may not be the most appropriate approach. These situations call for the ability to delay sending your email, allowing you to rectify errors, improve the content, or simply take a moment to gather your thoughts. By delaying email delivery in Outlook, you regain control over your messages and can ensure they are polished and well-timed.
Methods to Delay Sending an Email in Outlook
Now, let’s explore a few methods you can use to delay sending an email in Outlook.
1. Delay Delivery Option in Outlook
Outlook comes equipped with a built-in “Delay Delivery” option, which serves as your ally in timing emails in Outlook perfectly. This feature allows you to specify a future date and time. Imagine drafting an email during the late hours of the night but wanting it to arrive in your recipient’s inbox during business hours. With the Delay Delivery option, you can ensure your email is delivered at the most suitable moment.
2. Using Rules and Filters
Another effective way to delay email sending is by leveraging rules and filters in Outlook. By creating a rule that holds outgoing messages in the Outbox for a specific duration, you gain greater control over when your emails are dispatched. This method provides an opportunity to make any last-minute modifications or changes before your email is sent.
3. Utilizing Add-ins and Third-Party Tools
For those seeking even more advanced functionalities and customization options, third-party add-ins and tools can be integrated into Outlook. These add-ins enhance the default capabilities of Outlook and offer features specifically designed to delay email sending. They may provide options such as setting recurring delays, defining specific weekdays for sending, or even implementing approval processes before your emails are dispatched.
Now that we’ve covered the different methods let’s move on to a step-by-step process on how to delay sending an email in Outlook.
How to Delay Sending an Email in Outlook-Step-by-Step Guide:
Here’s a simple breakdown of the process you can follow to delay sending an email in Outlook:
Step#1. Enabling the Delay Delivery Option
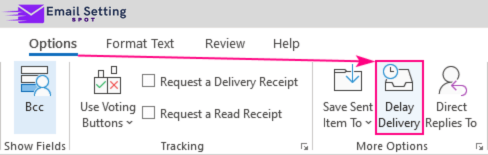
To begin, open Outlook and start composing your email as usual. Once you’ve crafted your message, navigate to the “Options” tab, usually located at the top of the compose window. Look for the “Delay Delivery” or “More Options” button, often found in the “More Options” group. Click on it to access the Delay Delivery settings.
Step#2. Setting a Specific Delivery Time
After accessing the Delay Delivery settings, a dialogue box will be displayed, providing you with the option to define the precise date and time for sending the email. Choose a suitable time and date that aligns with your intentions, making sure to consider time zones and the recipient’s availability. After setting the desired values, click “Close” .

Step#3. Modifying or Cancelling Delayed Emails
Rest assured, if you find the need to make modifications or cancel a delayed email, Outlook has the necessary features to assist you Simply navigate to the “Outbox” folder, locate the delayed email, and open it. From there, you can modify the delivery time, content, or any other details as needed. Once you’re satisfied with the changes, resend the email or delete it if it’s no longer required.
Using Rules to Delay Sending
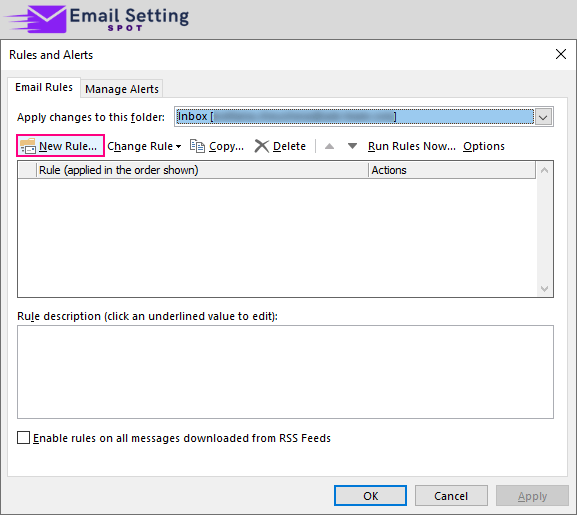
To create a rule for delaying email sending, follow these steps. Firstly, go to the “File” tab in Outlook and select “Manage Rules & Alerts.”

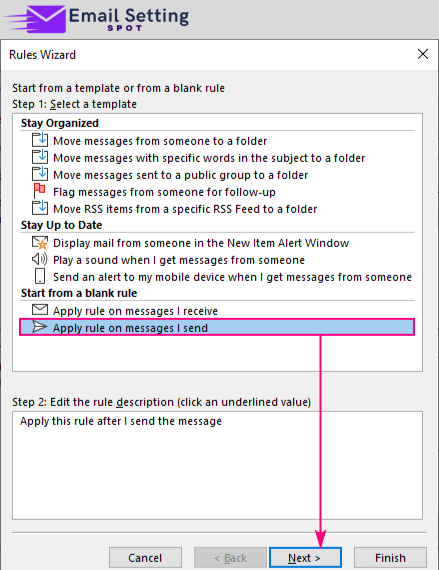
In the “Rules and Alerts” dialog box. Choose “New Rule” and select the option for applying the rule on messages you send.
From there, you can define the desired delay duration, specific conditions, and any other parameters you deem necessary. Once you’ve configured the rule to your liking, save it and let it work its magic.
5. Exploring Add-ins for Delayed Email Sending
For those seeking more advanced features and customization options, exploring third-party add-ins and tools can be an excellent choice. Visit the Microsoft AppSource or trusted third-party websites to discover various add-ins that cater to your specific needs. Look for add-ins that offer the features you desire, such as custom delay intervals, approval workflows, or advanced scheduling options. Install and configure the chosen add-in to unlock its full potential.
Benefits and Use Cases of Outlook Email Scheduling
Delayed email sending brings several benefits and can be applied in various use cases. Let’s explore some of these scenarios:
- Reviewing and Refining Emails: Delaying email sending allows you to review your messages one last time, ensuring they are error-free, concise, and convey the intended message effectively.
- Timing Your Emails: By strategically scheduling your emails, you can ensure they arrive at the recipient’s inbox at the most opportune moments, increasing the likelihood of engagement and response.
- Avoiding Impulsive Responses: By delaying the sending of emotionally charged emails, you provide yourself with a chance to cool down, reconsider your message, and respond more thoughtfully and professionally.
Conclusion
In conclusion, delaying email sending in Outlook is a valuable feature that empowers you to perfect your email communications. Whether you prefer utilizing the built-in “Delay Delivery” option, creating rules, or exploring third-party add-ins, the ability to control when your emails are sent brings numerous benefits. So, the next time you’re about to hit that “send” button, take a moment to consider if a delay might be the right choice.
I hope this guide on “How to Delay Sending an Email in Outlook” will be helpful for you. Stay tuned for our next blog!