
Outlook has a powerful feature many people forget — the ability to schedule an email to send later. That means you can write an email now. But have Outlook send it tomorrow morning, next week, after a meeting or at a perfect moment when the receiver is most likely to read it.
Maybe it’s too late at night to send a professional message. Maybe you want to follow up automatically. Maybe you want a reminder email to go out at a specific time. Or maybe you need to schedule dozens of messages in advance.
Outlook makes it easy — if you know where the button is.
This 2025 guide shows you every method, every device, every version, with clean steps and simple explanations.
Why Scheduling an Email in Outlook Helps So Much
Scheduling an email lets you:
- send messages during work hours
- avoid late-night or early-morning emails
- follow up automatically
- prepare project emails in advance
- send reminders without forgetting
- look more professional
- communicate across time zones
- manage workload better
- stay organized
It’s one of the simplest productivity boosts Outlook offers.
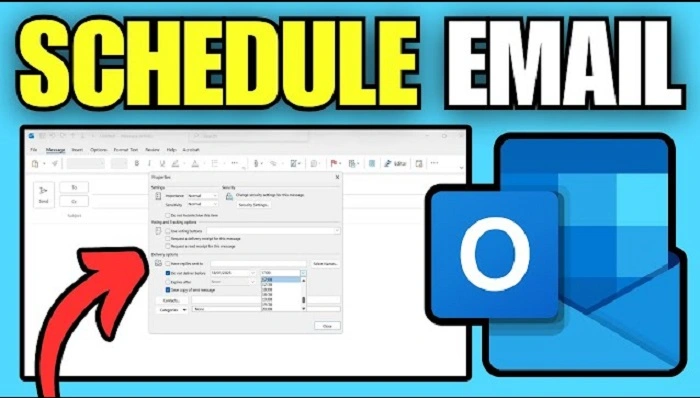
Schedule an Email Send in Outlook Desktop (Windows)
Classic Outlook has the strongest scheduling tools.
Steps:
- open Outlook
- click New Email
- write your message
- click the Options tab
- click Delay Delivery
- under “Delivery options,” check Do not deliver before
- choose your date
- choose your time
- click Close
- click Send
Your message now sits in the Outbox until the scheduled moment.
Tip:
- in some older Outlook versions, Outlook must remain open for scheduled emails to send.
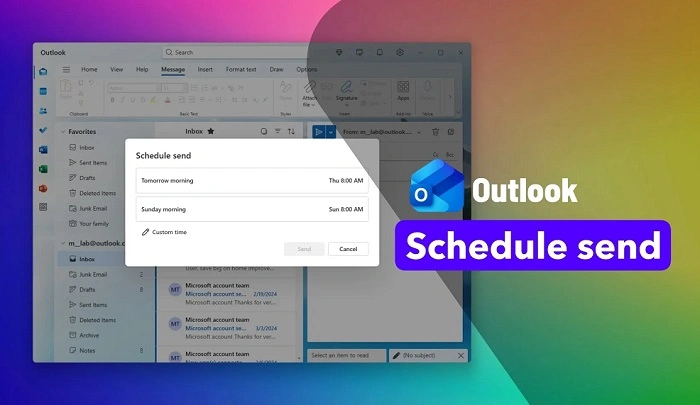
Schedule Send in the New Outlook (Modern Desktop Version)
Microsoft added a simpler “Schedule Send” button.
Steps:
- open the new Outlook
- click New Email
- type your message
- click the arrow next to Send
- click Schedule Send
- pick your date and time
- click Send
Outlook handles the sending automatically.
Schedule an Email in Outlook for Mac
Mac users get an easy version too.
Steps:
- open Outlook
- click New Message
- write your email
- click the arrow beside Send
- select Send Later
- choose date
- choose time
- click Send
Outlook for Mac stores the message in your Outbox and sends it at the right time.
Schedule Send in Outlook Web (Outlook.com)
If you use Outlook in your browser:
Steps:
- go to Outlook.com
- sign in
- click New Message
- write your email
- click the arrow next to Send
- click Send later
- pick your date
- pick your time
- click Send
Your scheduled emails appear in the Scheduled folder.
Tip:
- Outlook Web sends messages even if your computer is turned off.
Schedule Email Send on Outlook for Android
Outlook mobile supports scheduling.
Steps:
- open Outlook app
- tap Compose
- write your message
- tap the three dots (⋮) in the top right
- tap Schedule Send
- choose a time preset OR
- tap Pick date & time
- set your schedule
- tap Send
Your email is now scheduled on your phone.
Schedule Email Send on Outlook for iPhone (iOS)
Steps:
- open Outlook on iPhone
- tap New Message
- type your email
- tap the three dots (•••)
- tap Schedule Send
- choose date and time
- tap Send
Your iPhone will send it when the time arrives.
Edit a Scheduled Email in Outlook Desktop
If you need to change the scheduled time:
Steps:
- go to Outbox
- double-click the scheduled email
- click Options
- click Delay Delivery
- change the time
- close the window
- click Send again
To cancel:
- delete the message from the Outbox.
Method 8: Edit a Scheduled Email in Outlook Web
Steps:
- open Outlook.com
- click Scheduled folder
- select your scheduled message
- click Cancel send
- email returns to Drafts
- edit or resend at a new time
This gives you full control.
Why Your Scheduled Outlook Email Didn’t Send
If your email is stuck, check:
- internet connection
- Outlook Offline Mode
- closed Outlook (older desktop versions)
- Outbox errors
- account authentication issues
- VPN interference
- server or sync problems
Fix:
- reopen Outlook
- reconnect to the internet
- disable VPN
- restart the app
- clear the Outbox
- reenter your password
Most sending problems come from offline mode or network issues.
Schedule Recurring or Automatic Emails in Outlook
Outlook doesn’t have built-in recurring scheduled emails, but you can still do it.
Option 1: Use templates + Schedule Send
Option 2: Use Microsoft Power Automate
Option 3: Use Rules with Delayed Delivery
For templates:
- open your saved template
- click Schedule Send
- set the time
- send
This is perfect for weekly reminders, monthly updates, or routine tasks.
Send Scheduled Emails in Different Time Zones
To schedule accurately across time zones:
Steps:
- open Outlook
- click File → Options → Calendar
- enable time zone settings
- set your local zone
- set a secondary zone if needed
Outlook will convert the delivery time automatically for the recipient.
Use Delay Delivery for Advanced Scheduling (Classic Outlook)
Delay Delivery allows more options than standard scheduling.
You can:
- set exact delivery time
- prevent sending before a time
- expire email after a certain date
- control message properties
- create timing rules
Steps:
- open email
- click Options
- click Delay Delivery
- customize options
- send
Useful for long-term planning.
Auto-Delay Emails During Non-Work Hours
You can create a rule to delay emails written outside office hours.
Steps:
- click File
- choose Manage Rules & Alerts
- click New Rule
- select “Apply rule on messages I send”
- choose delay settings
- choose number of minutes
- finish setup
This prevents accidental late-night messages.
Troubleshooting: When “Schedule Send” Button Is Missing

Check if:
- your Outlook is outdated
- your account is POP/IMAP (limited features)
- your admin disabled scheduled send
- mobile app needs updating
- new Outlook not enabled
- sync settings are off
Fix:
- update Outlook
- switch to Exchange or Microsoft 365 account
- restart app
- check settings for disabled add-ins
The feature usually appears after updating.
Organization Tips After Scheduling Outlook Emails
To stay organized:
- check Outbox or Scheduled folder
- cancel accidental scheduled messages
- verify timing before sending
- use templates for repeated scheduled messages
- avoid scheduling emails too close together
- label your drafts for clarity
Better organization = fewer mistakes.
Quick Summary
How to schedule email send in Outlook:
- Windows: Options → Delay Delivery
- New Outlook: Arrow next to Send → Schedule Send
- Mac: Send Later
- Outlook Web: Send later
- Android: ⋮ → Schedule Send
- iPhone: ⋮ → Schedule Send
- Edit through Outbox or Scheduled folder
- Use Delay Delivery for advanced control
Just a few clicks — and Outlook sends your email exactly when you want.
FAQs
Do I need Outlook open for scheduled emails to send?
Only in older desktop versions.
New Outlook & Outlook Web work even when closed.
Can I schedule emails on mobile?
Yes — both iPhone and Android support Schedule Send.
Can I schedule recurring emails?
Not directly — use templates or Power Automate.
Will the receiver know my email was scheduled?
No — it looks like a normal email.
Can I cancel a scheduled Outlook email?
Yes — delete it from Outbox or cancel via Scheduled folder.