
Hey there! Are you looking to streamline your email communication? Well, creating an email group in Microsoft Outlook can be a game-changer. Let’s see How to Create an Email Group in Outlook?
Oftentimes, it is hard to keep in touch with contacts you have a hefty number of, and that is where email groups come in handy. By utilizing an email group, you can conveniently send messages to multiple recipients without the inconvenience of individually selecting each email address. It’s a real time-saver!
I will guide you through the step-by-step procedure of creating an email group in Outlook. It will enable you to save time and effort when sending messages to multiple recipients.
What is an Email Group?
An email group, also referred to as a contact group or distribution list, is a compilation of email addresses organized under a single name. When you send an email, the message is automatically distributed to all the members. It’s a convenient way to efficiently reach multiple recipients with just one email!
Benefits of Email Groups
Creating email groups offers several benefits that make your communication more efficient:
- Save Time: Instead of typing or selecting each recipient, you can send messages to multiple people in just a few clicks.
- Easy Management: Email groups allow you to organize and categorize your contacts based on specific criteria. It’s much easier to manage and update a group than individual contacts.
- Consistent Communication: When you have a predefined email group, you can ensure that all members receive important messages simultaneously. No more worrying about forgetting someone!
- Reduce Errors: By using email groups, you minimize the chances of typos or missing recipients. It’s a reliable way to ensure your messages reach the right people.
Now, let’s dive into the process of How to Create an Email Group in Outlook.
Creating an Email Group in Outlook
I have outlined the step-by-step process for creating an email group in Outlook, so you can easily manage and communicate with a group of contacts.
Step 1: Launch Outlook
First things first, open up Microsoft Outlook on your computer. Make sure to install latest version to enjoy all the latest features.
Step 2: Navigate to People
Next, click on the People or Contacts tab in the navigation bar of Outlook. It will take you to the Contacts section, where all your contacts are managed.

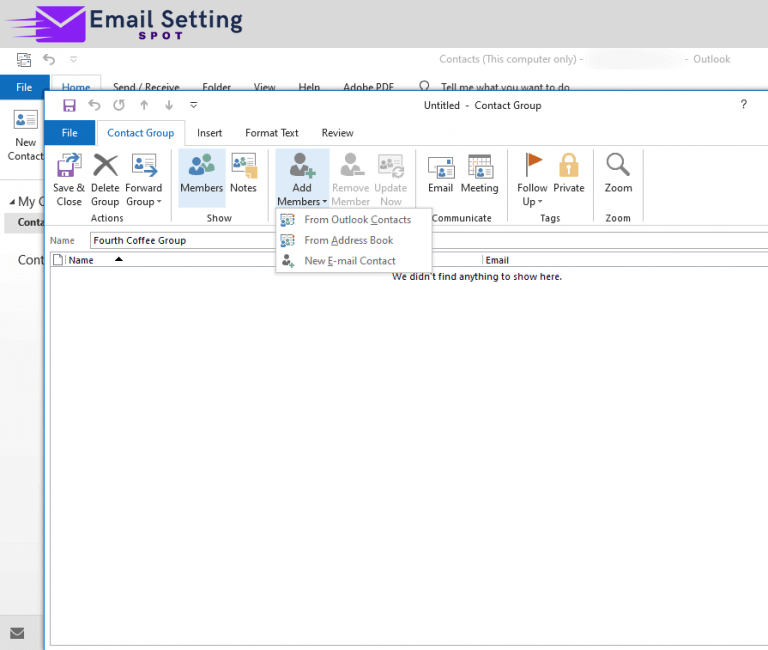
Step 3: Create a New Contact Group
In the Contacts section, I want you to select New Contact Group or New Group from the toolbar or menu. Upon clicking, a new window will open, providing us with the ability to create and manage our email group.

Step 4: Add Members to the Group
Now, let’s give our email group a name that reflects its purpose or the members it includes. Once you’ve got the name sorted, click on Add Members or a similar option to select contacts from your address book and add them to the group. To add multiple contacts simultaneously, simply hold down the Ctrl key while making your selections.
Step 5: Save the Group
Alright, we’re almost there! After adding all the desired members to the group, click on the Save & Close or OK button to save the email group. Congrats! You’ve created your very own email group in Outlook.

Step 6: Sending Emails to the Group
To send an email to the recently created group, open the compose window in Outlook and start typing group name in the To field. Outlook will suggest the group as you type. Select it, compose your email, and click on Send to deliver the message to all group members. It’s that simple!
Tips for Managing Email Groups
Here are a few handy tips for effectively managing your email groups:
- Regular updates: Take some time to review and update your email groups periodically. Make sure the members are up-to-date and relevant.
- Add new contacts: Whenever you come across new contacts that belong to a specific group, don’t forget to add them. It ensures that your groups stay comprehensive and up-to-date.
- Remove inactive members: If you have members who are no longer relevant or active, consider removing them from the email group. It helps keep your groups lean and accurate.
- Respect privacy: When sending emails to a large group, consider using the “Bcc” field to protect the privacy of individual recipients.
Conclusion
Creating an email group in Outlook can revolutionize the way you communicate with multiple recipients. To create your own email group, simply follow the step-by-step guide on “How to Create an Email Group in Outlook” mentioned above. By following the step-by-step guide I provided, you can easily create your own email group and enjoy the benefits of efficient communication. Don’t forget to manage your groups regularly for optimal results.