
Listen Detailed Podcast How To Configure Suddenlink Email Server Settings For Android
If you’re looking for a reliable email service provider, Suddenlink.net is a great choice. This email service is well-known for its security and user-friendly interface. However, configuring your Suddenlink.net email settings for Android devices can be confusing, especially if you’re not familiar with the process.
In this article, we will provide a step-by-step guide on how to set up Suddenlink.net email settings for Android devices. Moreover, follow the steps below to ensure that you can send and receive emails without any hitches.
Setting Up Suddenlink.net Email Settings for Android Devices
Follow the given below steps to set Suddenlink.net email settings for Android devices:
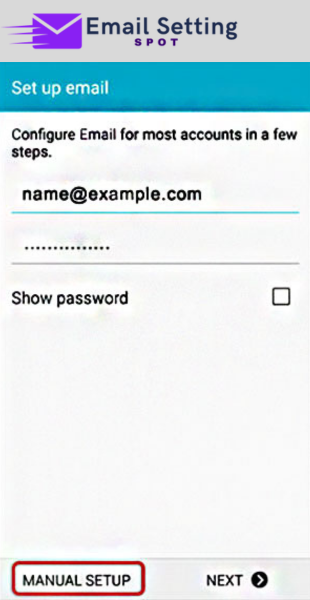
Step 1: Open the Email App
The first step in setting up Suddenlink.net email on your Android device is to open the email app. This app is usually pre-installed on most Android devices, and it can be found on your home screen or app drawer.
Step 2: Enter your Email Address and Password
After opening the email app, you will be prompted to enter your email address and password. Make sure to enter your complete email address, including the “@suddenlink.net” domain. After that, enter your Suddenlink.net email password and click “Next.” Choose Manual Setup.
Step 3: Choose the Account Type
Next, you will be asked to choose the account type. For the Suddenlink.net email, choose “POP” as the account type.

Step 4: Enter Server Settings
After selecting the account type, you will need to enter the server settings. To set up your Suddenlink.net email on your Android device, you should set the incoming server to “pop.suddenlink.net” and the port to “110” with the security type set to “None”.
- Secure – Port: 993and Security Type: SSL/TLS (Accept all certificates)
- Insecure – Port: 110 and Security Type: None (Accept all certificates)
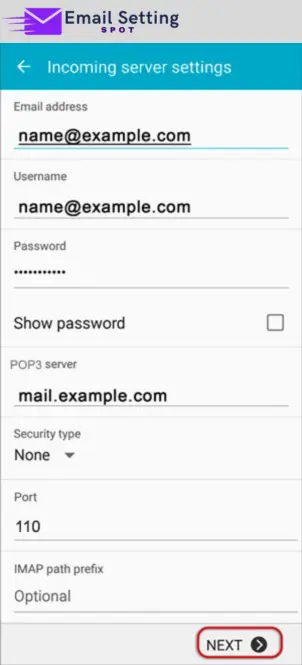
Then, enter “smtp.suddenlink.net” as the outgoing server name and set the port to “587” with the security type set to “None.”
Below are the general SMTP port settings:
- Outgoing (SMTP) Secure – Port: 465 for and Security Type: SSL/TLS (Accept all certificates)
- Outgoing (SMTP roaming server) Secure – Port: 587 and Security Type: SSL/TLS (Accept all certificates)
- Outgoing (SMTP) – Port: 25 and Security Type: None (Accept all certificates)
- Outgoing (SMTP roaming server) Insecure – Port: 587 and Security Type: None (Accept all certificates)

Step 5: Complete the Setup
Once you have entered the server settings, click “Next” to complete the setup process. After you have entered the settings, your Android device will verify them, and if everything is correct, it will take you to the inbox of your Suddenlink.net email account.
Securing the Suddenlink.net email account
Besides the steps mentioned above, there are other things to consider when setting up your Suddenlink.net email on Android. Here are a few tips to help you get started:
Step#1: Use a Strong Password: When creating a password for your Suddenlink.net email account, make sure to use a strong password that is difficult to guess. Your password should be a combination of upper and lowercase letters, numbers, and special characters.
Step#2: Enable Two-Factor Authentication: Two-factor authentication is a great way to add an extra layer of security to your Suddenlink.net email account. Additionally, enabling two-factor authentication will require you to enter a code sent to your phone every time you log in to your account.
Step#3: Check Your Spam Folder: Sometimes, legitimate emails may end up in your spam folder. Therefore, it’s essential to check your spam folder regularly to ensure that you don’t miss any important emails.
Step#4: Update Your Email App: Make sure to keep your email app updated to ensure that you have the latest security features and bug fixes. You can update your email app by going to the Google Play Store and checking for updates.
By following these tips, you can ensure that your Suddenlink.net email account is secure and that you don’t miss any important emails. So, go ahead and set up your Suddenlink.net email settings for Android devices today.
Conclusion
In conclusion, setting up Suddenlink.net email settings for Android devices is a simple process that can be completed in just a few easy steps. By following the step-by-step guide outlined in this article, you can ensure that your email account is set up correctly and that you can send and receive emails without any issues.
Additionally, by following the tips provided, you can ensure that your email account is secure and that you don’t miss any important emails. So, if you’re a Suddenlink.net email user, don’t hesitate to set up your account on your Android device today.